Tuesday, January 5, 2010

Jahshaka Tutorial - Green Screen

While you were looking at your desktop on Jahshaka, you might have seen a peculiar button that says "Keyer" on the lower panel. This here is what makes chroma keying possible. Just so that we are all on the same page, I'll show you where the button is in red.


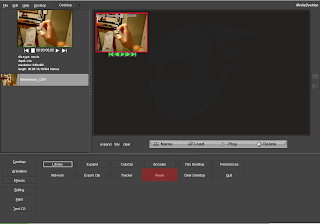
Go ahead and press the Keyer button. The video you want to chroma key doesn't need to have a background that's chartreuse or a deep blue, but those two colors, because of their properties of being rare in an image while also being on the far sides of the RGB spectrum, makes for much cleaner chroma keying. You'll know what I'm talking about later.


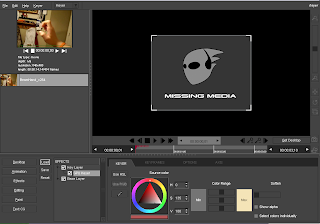
In any case, now you see that you are in a completely different window. Look at the tree at the bottom-left next to the major tabs. There is a Keyer Layer, subcatagorized by a GPU Keyer, and then the Base Layer. The reason why the GPU Keyer is called that is because the preview and the render is done by your graphics card, or whatever your GPU is. Thank God it was, since you now can preview your video at normal speed with the chroma key in effect.

At this stage, the importance of having a compatible video format becomes crucial (the reason for the Content Pipeline in the first tutorial). I suggest mpegs, since they always tend to work for me. Click on the GPU Keyer layer to highlight it, then drag the video you want to chroma key from your media player right on top of the layer. You should see your video pop up on your editing monitor in a couple seconds. Do the same thing for the Base Layer, which is the background picture or video that the other video is going to key over. Now we need to "key" the color you want to erase. To do that, click on the GPU Layer, then click on the eyedropper button on the left of the color wheel. You should see a zoomed-in image of your eyedropper in action on the upper-left. Find the pixel with the color you want to key, then click. The chroma key should take effect immediately.

Most likely, the first time you chroma key will produce a dirty result. To make it better, you probably need to adjust the range of colors that can be deleted. The sliders on the right of the color wheel are fit for that purpose. The top corresponds to red, middle for green, and the bottom for blue. If you had the pure green or blue background to key, this should be easy street, since these are colors that are uncontaminated by the other colors. All you need to fiddle around with is the range for the particular pure colored you keyed while bringing the other two sliders all the way down to the left. If you have a "mixed" color, then all I can say is good luck.

Once you have your desired result, click on the button resembling an old-fashioned video camera on the bottom-right of the preview monitor. This is the render button. Your video will be rendered and then moved straight to your desktop. Then, go to the Editing tab, throw that rendered video on the track, click the video camera button on the bottom-right of the preview monitor, and then watch your professionally chroma keyed spectacular.

Monday, January 4, 2010

Jahshaka Tutorial - Basic Editing

Editing clips is the bread and butter of all movie creation, so starting with that in Jahshaka seems to fit. One can realistically work with many video, sound, and picture formats in Jahshaka, but only a few work solidly with it. This means we need to create what's called a content pipeline.

Content Pipeline

A pipeline is essentially a protocol where only certain kinds of content are created and used during production. This greatly helps in stability, since you know everything will work as planned because everything's the same. Usually, one would go through trial and error with videos of different formats and run it through all of the different effects inside the program to see if the video format is stable enough, but since you most likely don't want to do that, I'll suggest mpegs for the videos, png's for the pictures, and wav's for the sounds. Mpegs work on everything inside Jahshaka, png's have good alpha support, and wav's just sound good.

"But, the videos I have aren't mpegs," you might say. Well, there is a free utility out there called Any Video Converter that handles all of that for you. Just throw in any video you have, tell the program to convert the video to the desired mpeg format, and then run it. Easy!

The program is pretty self-explanatory, but I had a hard time trying to find the Profile button, which I'll show you to save the hassle. It's highlighted in red.


Okay, Now Can We Play with Jahshaka?

Yes, we can. You know what we got to do. Start it up!


This here's what you should see first. All nice and clean. If you don't see the media player on your left, but instead the great gaping darkness similar to the right side, then take your cursor, position it all the way to the left side of the program, and then click and drag out, revealing the panel with the player. It's kind-of a nifty way to hide and show your important gadgets. The program is organized into many different "tabs," the major ones being Desktop, Animation, Effects, Editing, Paint, and Text CG, along with their sub-tabs, all located on the bottom left-hand corner. The tabs we will be working with in this tutorial are the Desktop and the Editing tabs.

Make sure that the Desktop tab is selected, then go ahead and load a movie or picture into the program using the silvery Load button. Pick the file, open it, and then you should see your file in the dark void (let's just call this the desktop). Anytime you load a file, you are only creating a reference to the original media, not a new copy, which is incredibly awesome for saving space. But, make sure you don't delete or move the original file or else the reference will be lost.


Anyway, I have a video here of my hand making strange motions trying to conjure up an energy beam, which later I will show you how to create. When you click on your video, the preview buttons pop down, which you can play with at your heart's delight, along with a thin green rectangular slider that you can drag from left to right to move the preview to different frames. You can also move the video anywhere on the desktop to suit your organizational tastes, whether that is the "controlled chaos" approach where you have clumps of media in separate piles, or the "righty tighty" tradition where all of the media is organized alphabetically with perfect spacing. To get the latter option, click on the "Tidy" button to the left of the silvery buttons below the desktop.

Okay, enough chit-chat. Let's get to editing!

Actual Editing


Click on the Editing tab. You should see something like up above. You have your typical timeline on the bottom, the media on your left, and the, uhh..., editing monitor on the right. To start, drag your video from the player to the track on your timeline. The video should pop up on your editing monitor. Either drag the white arrow or the red around to see it work. For this next section we are going to concentrate solely on the timeline part, which is where most of the editing action happens.


Notice the green numbers beside the labels In and Out. By directly clicking and dragging on it from left to right, you can set the time for the respective marker for the selected video. You don't need to deal with the red numbers so much because it just tells you how long the movie clip is, unless you desperately need something to go for 2 seconds exactly, although for some reason you can't edit it directly anyway. This is the same procedure you follow with sounds and pictures.

Now you have this sweet soundtrack you want to throw in the background, but you feel limited because of the one track. Now you need to add another one. Click on the Tracks... button in the upper-left, and click on Append if you want the new track to be behind the currently selected track or Insert to put it in front. Realize that from that same menu is where you can move tracks up and down and delete them.

Get your virtual knives ready because now we're splittin' clips. To do that, select the clip, move the white marker to the desired position, then press the "S" key. To undo, just press Ctrl Z. To delete a clip, press the Delete key.

Once you have the video the way you want, you need to render it. Jahshaka people call it the Render button, but so many people get frustrated (like me) on finding it because there is no button that says Render. I'll show you what they mean by the Render button highlighted in yellow.


Watch your edited video, and enjoy!